How to Fix Paint Cracking, Flaking, Chipping and Peeling
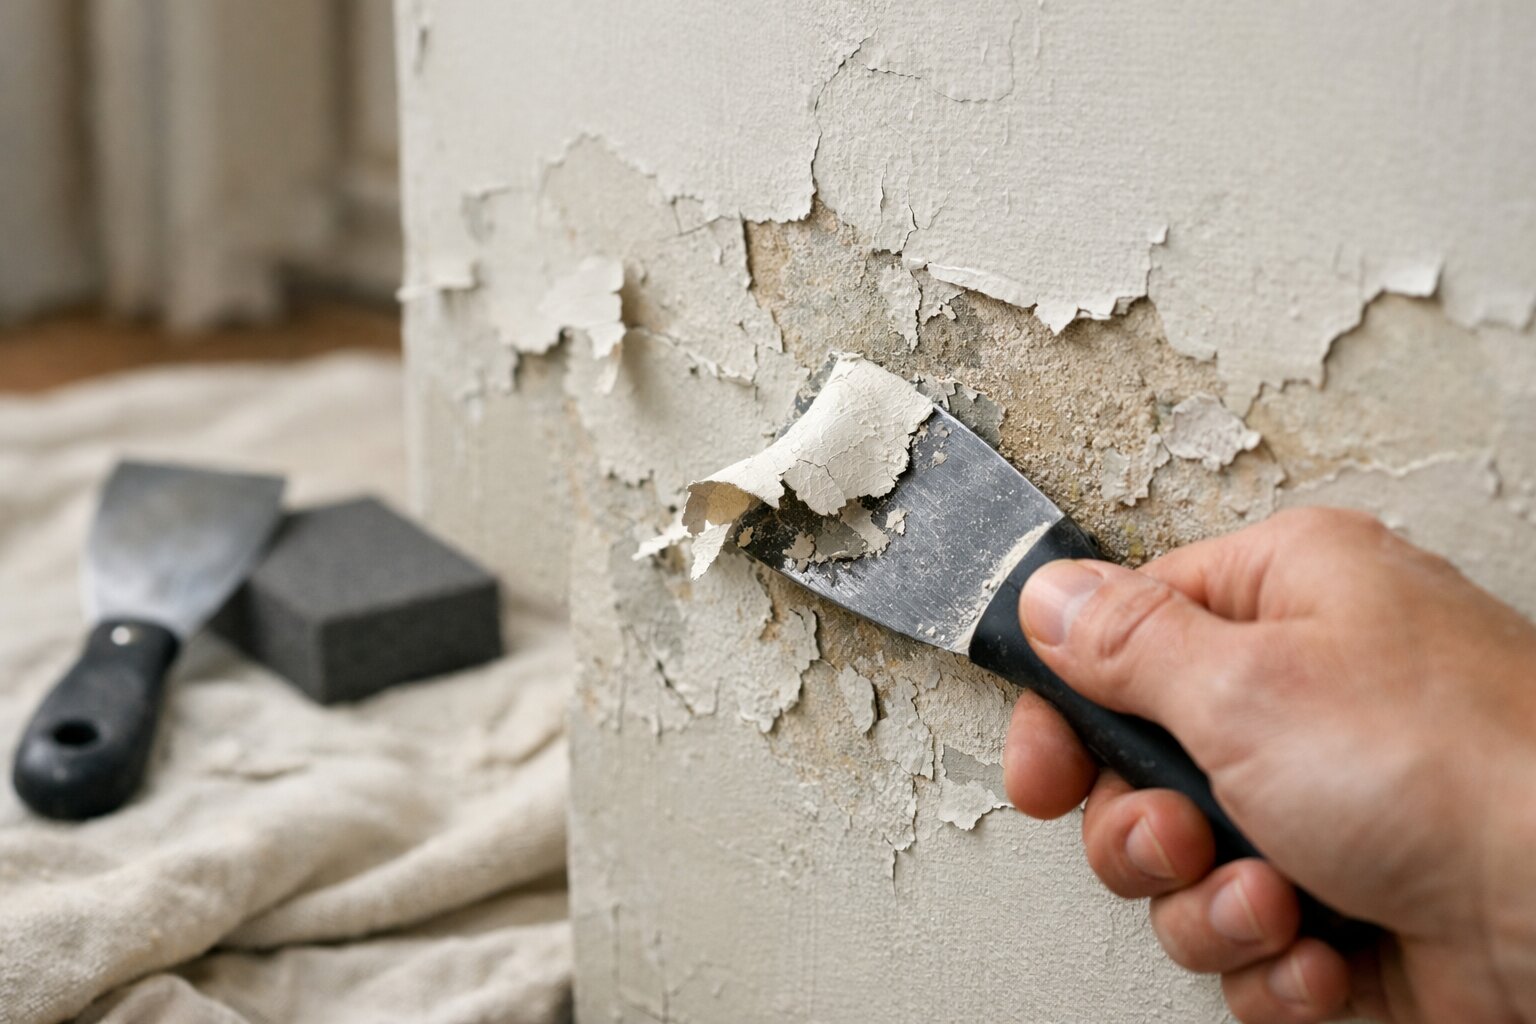
Table Of Content
- Introduction
- What Causes Paint to Crack, Flake, Chip, or Peel?
- Differences Between Cracking, Flaking, Chipping and Peeling
- Tools and Materials You’ll Need
- How to Fix Cracking Paint
- How to Fix Flaking Paint
- How to Fix Chipped Paint
- How to Fix Peeling Paint
- Step-by-Step: Complete Paint Repair Process
- How to Prevent Paint Problems in the Future
- Common Mistakes to Avoid
- When to Call a Professional Painter
- Final Thoughts
To fix paint cracking, flaking, chipping, or peeling, remove all loose paint, sand the surface smooth, clean the area thoroughly, apply a suitable primer, and repaint using thin, even coats. These issues are usually caused by poor surface preparation, lingering moisture, or applying paint incorrectly, so fixing the root cause is essential for a long-lasting finish. Whether you are dealing with a damp bathroom ceiling or an old living room wall, understanding the best paint damage solutions will ensure your repair lasts. With the right tools and patience, anyone can restore their walls.
What Causes Paint to Crack, Flake, Chip, or Peel?
Understanding why your wall paint problems are happening is the first step toward a permanent solution. If you simply paint over the damage without addressing the underlying issue, the new paint will inevitably fail in the exact same way.
Most paint problems are caused by poor preparation or moisture.
Here are the most common culprits:
- Poor surface preparation: Applying paint over a dusty, greasy, or dirty wall prevents the paint from bonding to the surface.
- Moisture or damp walls: Water from leaking pipes, roof leaks, or high humidity (especially in bathrooms and kitchens) pushes through the wall and forces the paint outward, causing it to lose adhesion.
- Incompatible paint layers: Applying a water-based latex paint directly over a high-gloss oil-based paint without proper sanding or priming will cause the top layer to slide off or peel.
- Applying paint too thickly: Slapping on thick coats of paint means the surface dries faster than the layers underneath, leading to shrinkage and cracking as the paint cures.
- Extreme temperature changes: Paint expands and contracts with temperature fluctuations. If the environment is too hot or too cold during application, the paint film can become brittle and fracture.
Differences Between Cracking, Flaking, Chipping and Peeling
While these terms are often used interchangeably in DIY room painting, they actually describe distinct types of paint adhesion issues. Identifying the exact nature of your paint failure will help you choose the correct cracked paint fix or peeling paint repair method.
Below is a breakdown of how to identify each issue:
| Issue | Description | Common Cause |
|---|---|---|
| Cracking | Fine lines or spiderweb patterns in the paint film. | Thick layers, aging paint, or temperature fluctuations. |
| Flaking | Paint lifting and detaching in small, brittle pieces. | Poor adhesion, painting over dirt, or degraded paint. |
| Chipping | Small, localized pieces breaking off the surface. | Physical impact, weak bond, or bumping into corners/trims. |
| Peeling | Large, continuous sections or sheets coming off the wall. | Moisture trapped behind the wall or severe lack of surface preparation. |
Cracking and chipping are often localized issues that can be fixed with minor surface repairs. Flaking and peeling, however, usually indicate systemic paint adhesion issues that require more extensive interior wall repair to ensure the new coats of paint stick properly.
Tools and Materials You’ll Need
Before you begin repainting walls, gathering the proper tools will make the process infinitely smoother. The right materials ensure you properly remove the damaged layers and create a solid foundation for your fresh paint.
Here is what you will need:
- Paint scraper: A rigid, metal putty knife or a dedicated paint scraper tool to remove loose debris.
- Sandpaper: Medium grit (80 to 120-grit) for leveling rough edges, and fine grit (220-grit) for finishing. A sanding block is highly recommended.
- Filler or spackle: A high-quality interior wall filler to level out the depressions left by removed paint.
- Primer: A binding primer, particularly a moisture-resistant or stain-blocking primer, depending on the root cause of the damage.
- Paint: High-quality interior paint that matches your existing wall.
- Putty knife: A flexible blade (2 to 4 inches) for applying the filler smoothly.
- Cleaning cloth and solution: A sponge or microfiber cloth with a mild degreaser (like TSP or sugar soap) to clean the wall.
- Roller and brushes: For applying the primer and paint flawlessly.
How to Fix Cracking Paint
Cracking paint often resembles the dried, cracked mud of a riverbed (sometimes called "alligatoring") or appears as fine, hairline fractures across the wall. Because this is usually caused by paint drying too quickly or being applied too thickly, the fix revolves around removing the inflexible layers.
Start by using your paint scraper to gently scrape away the cracked paint. You do not need to scrape the entire wall—just the areas where the paint is actively fractured and lifting. Once the loose bits are removed, use medium-grit sandpaper to sand the area smooth, paying special attention to the edges where the cracked paint meets the intact paint.
If removing the cracks leaves a noticeable depression in the wall, use your putty knife to apply a thin layer of filler or spackle. Allow it to dry completely, then sand it perfectly flush with fine-grit sandpaper. Apply a high-quality primer over the repaired area to seal the filler. Finally, repaint the section using thin, even coats, ensuring you allow adequate drying time between each layer to prevent the cracking from returning.
How to Fix Flaking Paint
Flaking paint on walls is characterized by small, brittle pieces of paint curling up and falling off. This happens when the paint completely loses its bond with the underlying surface, often because the wall was dusty or chalky when it was originally painted.
To implement a flaking paint solution, you must forcefully remove all the loose flakes. Use a wire brush or a paint scraper to scrape the wall. Keep scraping until you reach paint that is firmly adhered to the wall.
Next, clean the area thoroughly. Since dust is a primary cause of flaking, wash the exposed wall with a damp cloth and a mild degreaser to remove any residual chalkiness or dirt. Once dry, use your sandpaper to "feather" the edges. Feathering means sanding the transition line between the bare wall and the intact paint until it feels perfectly smooth to the touch. Apply a binding primer to ensure your new paint grips the surface, and follow up with your topcoat.
How to Fix Chipped Paint
Chipped paint is the most common form of physical paint damage. It usually happens on door frames, baseboards, window trims, and outside corners of walls where objects (like furniture, vacuum cleaners, or toys) bump into the surface.
Because chipping is localized, the paint chipping solution is highly targeted. Start by picking away any loose fragments immediately surrounding the chip. Since chipped areas often run deep (sometimes down to the bare wood or drywall), you will almost always need to fill the gap.
Apply your filler or spackle into the chipped area using a putty knife, overfilling it very slightly to account for shrinkage as it dries. Once fully cured, sand the repaired area smooth with fine-grit sandpaper until it matches the contour of the trim or wall. Wipe away the sanding dust, apply a spot-primer to the patched area, and repaint it to blend seamlessly with the surrounding surface.
How to Fix Peeling Paint
Peeling is the most severe of all wall paint problems. When paint comes off in large, flexible strips or sheets, you are almost certainly dealing with severe moisture intrusion or a complete failure to use primer on a difficult surface.
Always fix the underlying cause before repainting peeling areas.
If you simply paint over a peeling wall, the moisture will push the new paint off within weeks. First, identify the moisture issue. Check for leaking pipes, roof damage, or poorly ventilated bathrooms. Fix these structural or plumbing issues first. If the peeling is in a bathroom, ensure your exhaust fan is working correctly.
Once the root cause is solved and the wall is entirely dry, use your scraper to remove all peeling paint. You may find that large sheets come off effortlessly—keep peeling until the paint stops lifting. Repair any damage to the drywall or plaster underneath, then apply a layer of filler to smooth the transition between the bare wall and the remaining paint. Sand the area flawlessly.
Because peeling means the wall was likely subjected to moisture, apply a high-quality, moisture-resistant primer (such as a pigmented shellac or oil-based primer) to seal the surface. Finally, repaint properly with a moisture-resistant interior paint.
Step-by-Step: Complete Paint Repair Process
Whether you are performing a cracked paint fix, fixing flakes, or tackling major peeling, the underlying methodology remains the same. Follow this consolidated, step-by-step interior wall repair guide to guarantee professional results.
Step 1 – Remove Damaged Paint
Never paint over failing paint. Take your paint scraper and hold it at a 45-degree angle to the wall. Push firmly beneath the cracked, flaking, or peeling edges. Scrape thoroughly until the remaining paint is solidly adhered to the wall and cannot be lifted by the blade.
Step 2 – Sand the Surface
The goal of sanding is twofold: to rough up the bare surface so new paint can grip it, and to smooth the "step" between the bare wall and the old paint. Wrap 120-grit sandpaper around a sanding block and sand the edges aggressively until they are tapered (feathered). Finish with 220-grit sandpaper until you cannot feel the transition line when running your fingers over it.
Step 3 – Clean the Wall
Sanding creates fine dust that will ruin the adhesion of your new paint. Take a slightly damp microfiber cloth or a sponge soaked in a mild sugar soap/TSP solution and wash the entire repair area. Remove all dust, oils, and grease. Let the wall dry completely.
Step 4 – Repair the Surface
If scraping and sanding have left deep gouges or an uneven surface, apply wall filler. Scoop a small amount of spackle onto a flexible putty knife and pull it tightly across the void. Let it dry according to the manufacturer's instructions, then lightly sand it perfectly smooth.
Step 5 – Apply Primer
Primer is the glue that holds your repair together. It improves adhesion, seals the porous filler, and blocks underlying stains. Using a brush or a small foam roller, apply a thin, even coat of primer over the entire patched area. Allow the primer to dry fully.
Step 6 – Repaint Properly
Once the primer is dry, you can apply your topcoat. Stir your paint thoroughly. Apply the paint in thin coats, feathering the edges outward with your brush or roller to blend the new paint into the old paint seamlessly. Allow the first coat to dry entirely before applying a second coat to ensure maximum durability and color matching.
How to Prevent Paint Problems in the Future
The best peeling paint repair is the one you never have to do. Preventing paint failure comes down to respecting the painting process and not cutting corners.
First and foremost, prioritize proper surface preparation. Every wall must be clean, dry, and dull before a brush ever touches it. Wash away dirt and grease, and lightly sand glossy surfaces so the new paint has a "tooth" to grip.
Always use primer when dealing with unpainted drywall, patched areas, wood, or when making drastic color transitions. Primer acts as an anchor for your topcoat.
When applying your paint, avoid the temptation to apply thick coats to save time. Thick coats dry unevenly, leading to shrinking and cracking. Instead, apply two to three thin coats. Additionally, allow proper drying time between each coat. If the tin says to wait four hours, wait four hours; painting over semi-wet paint will cause the layers to pull away from each other.
Finally, fix moisture issues proactively. Use dehumidifiers in damp basements, always run exhaust fans during and after showers, and use high-quality, moisture-resistant paints in kitchens and bathrooms.
Common Mistakes to Avoid
When implementing paint damage solutions, DIYers often make a few critical errors. Avoid these common pitfalls to ensure your repair lasts:
- Painting over damaged paint: Slapping new paint over peeling or flaking paint will only add weight to the failing layer, causing it to fall off faster.
- Skipping primer: Filler and bare drywall absorb paint rapidly. Without primer, your topcoat will look dull, patchy, and will eventually flake off.
- Ignoring moisture: Painting over a damp spot without fixing the leak guarantees the paint will bubble and peel again.
- Rushing drying time: Applying a second coat before the first is dry leads to cracking and alligatoring.
- Poor cleaning: Leaving sanding dust on the wall acts as a barrier, preventing your new paint from actually touching the wall.
When to Call a Professional Painter
While fixing localized chips, flakes, and cracks is a highly accessible DIY project, some scenarios warrant professional intervention.
You should consider calling a professional painter if you are dealing with large damaged areas where entire walls are peeling, as this requires extensive scraping, skim-coating with joint compound, and heavy sanding. If you have recurring issues where paint continues to peel in the exact same spot despite your best efforts, a pro can diagnose hidden structural or damp problems.
Furthermore, if the peeling paint is on exterior surfaces or high ceilings where ladders are required, hiring a professional ensures the job is done safely and correctly the first time.
Final Thoughts
Paint cracking, flaking, chipping, and peeling are common issues, but they can be fixed with proper preparation and the right techniques. Addressing the root cause—whether that is moisture, dirt, or poor application—ensures a smooth and long-lasting finish. By taking the time to scrape, clean, patch, and prime, you can seamlessly restore the beauty of your walls.


Answers to Your Common Questions
Paint cracking or peeling is usually due to poor surface preparation, applying paint over a dirty or dusty surface, applying coats too thickly, or underlying moisture issues pushing the paint away from the wall.
No, it should be removed first. Painting over peeling paint does not fix the broken bond beneath it. The old paint will continue to lift, taking your fresh, new coat of paint down with it.
The best method is to scrape away all loose flakes, sand the edges smooth (feathering), clean the wall to remove dust, apply a high-quality bonding primer, and repaint the area.
Yes, primer significantly improves adhesion. It acts as a binding layer that grips the bare wall or filler on one side and provides a perfect, uniform surface for the topcoat of paint to grip on the other.
To prevent future cracking, ensure the surface is completely clean before painting, use a high-quality primer, apply paint in thin, even coats, and allow each coat to dry completely before adding the next.
You should wait until the surface is fully dry. If you have washed the wall or repaired a leak, the wall must be bone-dry. Between coats of paint, follow the manufacturer's recommended drying time—usually 2 to 4 hours.
Often yes, especially in bathrooms, kitchens, or ceilings directly below plumbing. If the paint is peeling off in large sheets and the wall beneath feels cool, soft, or damp, you have a moisture problem that must be fixed before repainting.
YOU MIGHT ALSO BE INTERESTED IN