9+ Simple Ways To Remove Stains & Scratches From Wood
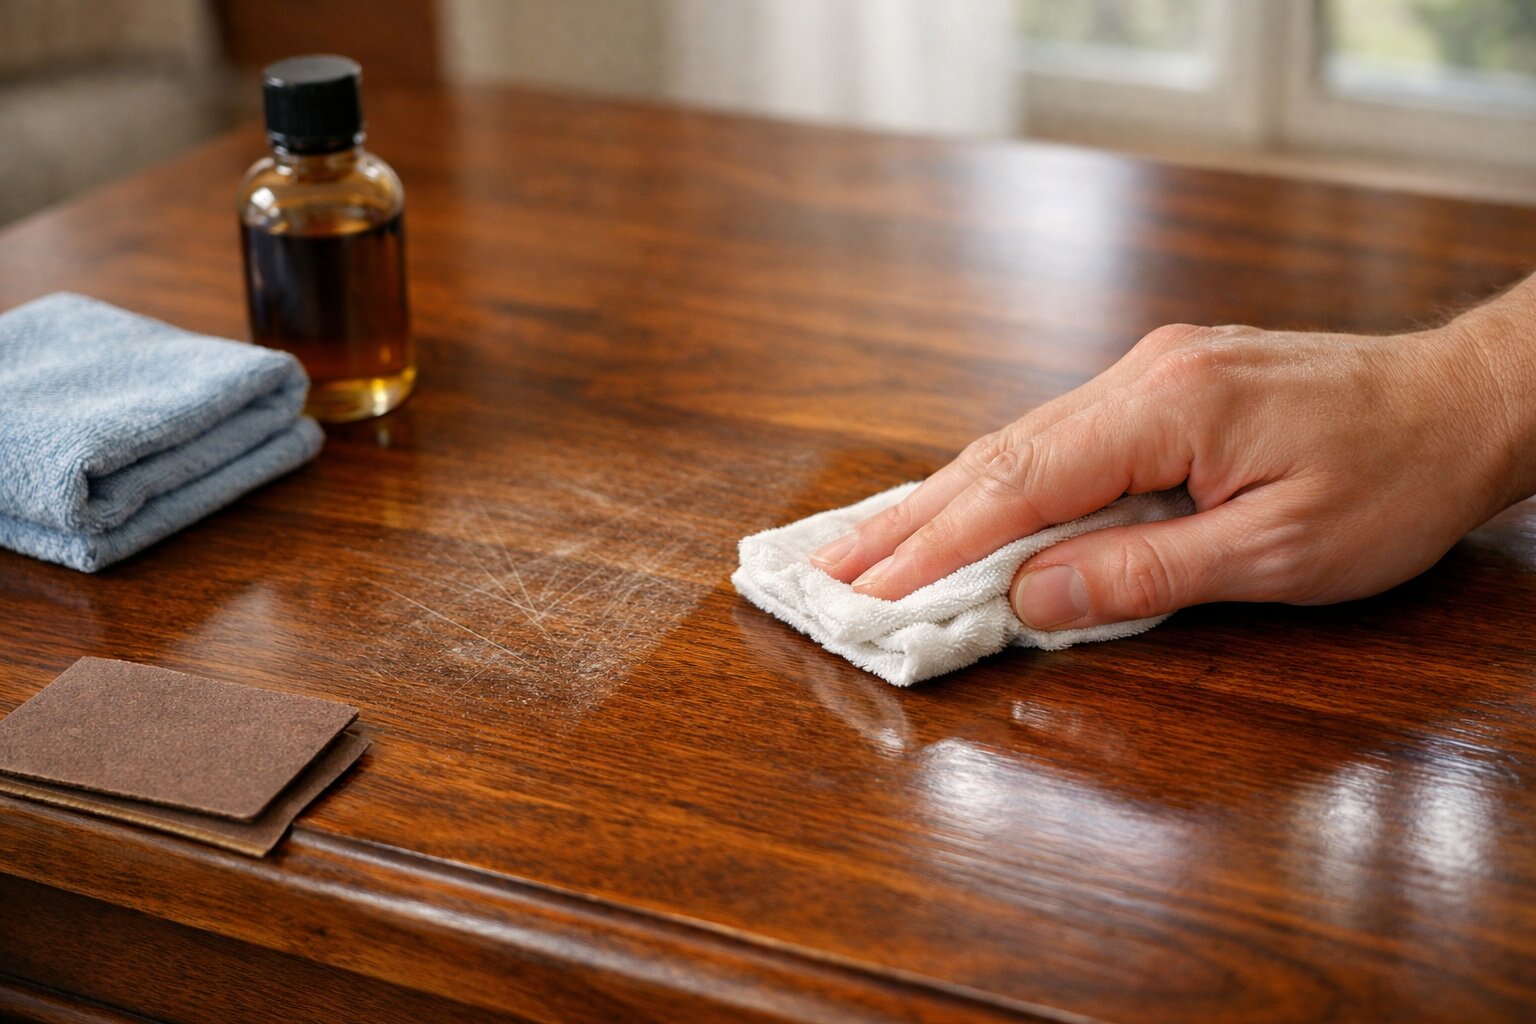
Table Of Content
- Introduction
- Types of Wood Stains and Scratches
- Tools and Materials You’ll Need
- 9+ Simple Ways To Remove Stains & Scratches From Wood
- How to Fix Deep Scratches in Wood
- How to Remove Water Stains from Wood
- How Long Does Wood Repair Take?
- Tips to Prevent Stains and Scratches on Wood
- Common Mistakes to Avoid
- When to Refinish or Replace Wood
- Final Thoughts
To remove stains and scratches from wood, first identify the type of damage, then use simple methods like vinegar solutions, baking soda, toothpaste, or wood polish depending on the severity. Light scratches can often be buffed out, while deeper damage may require filler or sanding. With the right technique, most wood surfaces can be restored quickly at home.
Whether you have inherited a beautiful antique dining table, discovered water rings on your coffee table, or accidentally scraped your hardwood floors, wood damage is a common household frustration. Fortunately, furniture restoration and DIY wood repair do not always require a professional touch.
Types of Wood Stains and Scratches
Before diving into a surface scratch fix, you must first accurately diagnose the damage. The approach you take depends entirely on how deeply the stain or scratch has penetrated the wood's finish.
Different types of stains and scratches require different repair methods.
- White Water Stains: These light, cloudy rings occur when moisture is trapped in the clear protective finish (varnish, polyurethane, or wax) but has not yet reached the actual wood grain.
- Dark Water Stains: A dark brown or black stain means water has fully penetrated the protective seal and reacted with the natural tannins in the wood or the metal of a sitting object.
- Heat Marks: Similar to white water stains, heat marks appear as a white haze caused by placing hot mugs or pizza boxes directly on the wood, damaging the finish.
- Oil Stains: Dark, greasy spots caused by food spills, cosmetics, or excess furniture polish soaking into unsealed wood.
- Surface Scratches: Minor scuffs and dings that only breach the topmost clear coat. They often look white or dull but do not expose raw wood.
- Deep Scratches: Gouges that cut through the finish and the stain, exposing the lighter, raw wood beneath. You can usually catch your fingernail in these scratches.
Tools and Materials You’ll Need
The best part about DIY wood repair is that you likely already have most of the necessary supplies in your kitchen or bathroom cabinet. Gathering your materials beforehand will make the repair process smooth and efficient.
For a comprehensive wood repair kit, include the following:
- Soft cloths: Microfiber or lint-free cotton rags are essential for buffing and applying solutions without adding new micro-scratches.
- Sandpaper: Medium-grit (120) and fine-grit (220) for smoothing deeper repairs.
- Wood polish or furniture wax: To restore the shine and protective layer after the fix.
- Baking soda: A gentle abrasive that works wonders on stubborn stains.
- White vinegar: An excellent, mild acid for cleaning and lifting marks.
- Toothpaste (non-gel): Acts as a micro-polishing compound for fine scuffs.
- Olive oil (or mineral oil): To nourish the wood and blend in surface scratches.
- Wood filler or wood putty: Necessary for filling deep gouges.
- Touch-up markers or crayons: For blending repaired areas back into the surrounding wood stain.
9+ Simple Ways To Remove Stains & Scratches From Wood
When it comes to learning how to fix wood furniture, starting with the least invasive method is always the best practice. Below are the most effective, step-by-step methods to remove stains and scratches from wood.
1. Vinegar and Oil Solution (For Light Stains)
If you are dealing with minor scuffs or superficial water rings, a simple pantry mixture works wonders. Mix equal parts white vinegar and olive oil in a small bowl. The vinegar acts as a mild cleaner to lift the stain, while the oil deeply penetrates and hydrates the wood, making light scratches disappear. Dip a soft cloth into the mixture and rub it directly over the stain or scratch, going with the grain of the wood. Let it sit for a few minutes, then wipe the area completely clean with a dry cloth to reveal a refreshed surface.
2. Baking Soda Paste (For Tough Stains)
Baking soda is a miracle worker for stubborn white water rings and ink stains. Create a thick paste by mixing one tablespoon of baking soda with just enough water (or toothpaste) to form a spreadable consistency. Apply the paste gently to the stained area using a soft cloth. Rub it in circular motions, applying light pressure. The mild abrasive nature of baking soda buffs away the damaged finish without harming the wood beneath. Once the stain lifts, wipe the paste off entirely with a damp cloth and dry the area.
3. Toothpaste Method (For Minor Scratches)
Standard, non-gel white toothpaste contains silica, which serves as a microscopic abrasive—perfect for sanding out minor surface scratches without needing actual sandpaper. Dab a pea-sized amount of toothpaste onto the scratch. Using a cotton swab or a clean cloth, rub the toothpaste over the scratch in a circular motion for about a minute. You are effectively buffing the clear coat surrounding the scratch until it blends. Wipe away the residue with a damp cloth and buff the surface dry.
4. Walnut Trick (For Surface Scratches)
One of the most famous wood polishing tips is the walnut trick. Raw walnuts contain natural oils that are excellent for filling and camouflaging light scratches on medium to dark woods. Take a shelled, raw walnut (pecans and almonds also work) and rub it diagonally across the scratch. The friction will warm the nut's natural oils, allowing them to seep into the wood. After rubbing, massage the area with your finger to help the oil penetrate, then let it sit for a few minutes before gently buffing with a soft cloth. The scratch will darken and blend into the finish.
5. Wood Polish or Furniture Wax
Often, what appears to be a scratch is just a dull streak where the protective clear coat has been scraped away. Applying a high-quality commercial wood polish or a hard carnauba furniture wax can restore the lost shine and reduce the visibility of these marks. Apply the wax with a lint-free cloth, let it dry to a haze, and vigorously buff it out. The wax fills the microscopic valleys of the scratch, making it invisible to the naked eye.
6. Sanding and Refinishing (For Deep Scratches)
When a scratch is too deep for walnuts or oil, you must resort to mechanical removal. Tape off the area around the scratch to protect the surrounding finish. Lightly sand the scratch with fine-grit sandpaper (always follow the direction of the wood grain) until the scratch levels out. Wipe away the dust. You will then need to reapply a matching wood stain to the sanded area with a cotton swab, letting it dry completely before sealing it with a dab of polyurethane or clear varnish.
7. Iron Method (For Water Rings)
White water rings are simply trapped moisture. You can evaporate this moisture by applying dry heat. Empty all the water from your clothing iron to ensure there is no steam. Place a clean, dry cotton towel or t-shirt completely over the water stain. Set the iron to its lowest heat setting. Briefly and continuously rub the warm iron over the towel for 5 to 10 seconds. Lift the towel to check the stain. Repeat this process until the trapped moisture evaporates and the white ring disappears.
8. Commercial Wood Repair Kits
If you don't want to experiment with DIY pantry solutions, commercial wood repair kits are incredibly effective. These kits typically include wax crayons (putty sticks) and touch-up markers in various wood tones. For a scratch, simply rub the wax crayon directly into the gouge until it is filled and level with the surface. Use a plastic scraper or credit card to remove the excess wax. Then, use the touch-up marker to draw the wood grain pattern back over the repaired area.
9. Lemon Oil Treatment
Over time, wood can become dry and brittle, making it far more susceptible to scratches and staining. A thorough lemon oil treatment nourishes the wood fibers, restoring elasticity and a rich color. Apply pure lemon oil (specifically formulated for furniture) to a soft rag and massage it entirely into the wood surface. Let it soak for 15 minutes before buffing off the excess. This will heavily reduce surface dullness and mask a multitude of tiny scratches.
10. Hydrogen Peroxide (For Dark Stains)
Dark water rings indicate that moisture has bypassed the finish and caused the wood itself to oxidize or mold. Standard cleaning won't work; you need to bleach the wood back to its original color. Soak a cotton pad in 3% hydrogen peroxide and press it directly onto the dark stain. Let it sit for a few hours (you may need to cover it with plastic wrap to keep it wet). The peroxide will slowly lighten the dark stain. Once the color matches the surrounding wood, remove the pad, neutralize the area with white vinegar, let it dry, and refinish the spot.
How to Fix Deep Scratches in Wood
While surface scuffs are easy to hide, gouges that physically remove chunks of wood require structural repair. If your pet has heavily scratched a door frame or you've dragged heavy metal across a tabletop, you will need to reconstruct the surface using wood filler.
Start by cleaning the gouge with a damp cloth to remove any splinters, dirt, or loose wood fibers. Once dry, take a small putty knife and press wood filler (or wood putty) firmly into the deep scratch. Overfill the scratch slightly, as the filler will shrink a bit as it dries.
Allow the filler to dry completely according to the manufacturer's instructions. Once hardened, use fine-grit sandpaper to sand the filler perfectly smooth and level with the surrounding wood. Because wood filler does not contain wood grain, it will look like a flat, solid patch. Use a touch-up marker to carefully dab color onto the filler to match your existing stain, and finally, seal the repair with a layer of clear protective finish.
How to Remove Water Stains from Wood
Water stains are arguably the most common type of wood damage. The key to removing water stains from wood is differentiating between white stains and dark stains.
For white, cloudy rings (moisture trapped in the finish), the heat method is highly effective. As detailed above, using a dry iron over a cotton towel pulls the moisture out. Alternatively, you can use a hair dryer on a medium heat setting. Wave it back and forth over the stain for about 15 minutes until the ring vanishes. If heat doesn't work, rubbing an oil-based solution like mayonnaise or petroleum jelly into the white ring and leaving it overnight allows the oils to displace the trapped water.
For dark stains, the wood has been physically altered. You must strip the protective finish off the stained area first. Once bare, use the hydrogen peroxide method or a commercial wood bleach (oxalic acid) to pull the dark coloration out of the wood grain. After the stain lightens, you must lightly sand, restain, and reseal the area.
How Long Does Wood Repair Take?
The timeframe for DIY wood repair varies drastically based on the severity of the damage and the method chosen.
For light fixes, such as rubbing a walnut over a surface scratch or using toothpaste to buff out a scuff, the process takes mere minutes. The iron method for white water rings usually yields results in under ten minutes.
However, deeper repairs require significantly more patience. If you are using wood filler for a deep gouge, the filler may take anywhere from 2 to 8 hours to cure before it can be sanded. If the damage requires stripping, bleaching, restaining, and applying a new clear coat, the process will span several days to allow for proper curing times between each chemical layer.
Tips to Prevent Stains and Scratches on Wood
The best wood scratch repair is the one you never have to do. Implementing a few basic wood maintenance habits will keep your furniture and floors looking pristine for decades.
- Use coasters and trivets: Never place hot mugs, chilled glasses, or hot food boxes directly on a wooden surface. The temperature shock and condensation are the primary causes of white heat marks and water rings.
- Avoid prolonged heat and sun exposure: Keep antique or valuable wood furniture out of direct, harsh sunlight and away from radiators. UV rays break down the clear coat and bleach the wood, making it brittle and prone to scratching.
- Clean up spills immediately: Wood is naturally porous. Even if it is sealed, standing liquid will eventually find a microscopic crack in the finish and seep in. Wipe up spills the moment they happen.
- Use felt pads under decor: Attach small adhesive felt pads to the bottom of lamps, vases, and decorative trays. This prevents sharp ceramic or metal edges from carving deep scratches into your tables when moved.
- Avoid harsh chemicals: Never clean wood with ammonia, bleach, or heavy-duty abrasive cleaners. These strip the protective oils and varnishes. Stick to dedicated wood cleaners or a simple damp microfiber cloth.
Common Mistakes to Avoid
When attempting to restore wood furniture at home, avoid these common pitfalls that can make the damage worse:
- Using too much water: Soaking wood while trying to clean it will cause the grain to swell, warp, and crack.
- Aggressive sanding: Sanding against the grain or using coarse sandpaper will create hundreds of new, visible scratches that are incredibly difficult to fix.
- Wrong products: Using silicone-based dusting sprays can leave an oily residue that prevents future stains or paints from adhering to the wood.
- Ignoring the wood finish: Applying a dark oil to a light wood or using an incompatible finish can leave a permanent, ugly patch.
- Rushing repairs: Not letting wood filler dry completely before sanding will cause the patch to tear out.
When to Refinish or Replace Wood
While this guide covers many minor DIY repairs, some damage is simply too severe for toothpaste and walnuts.
You should consider completely stripping and refinishing the wood or calling a professional cleaner, if a piece of furniture has deep structural issues, widespread black water damage, or severe pet chewing damage. Additionally, if the furniture is covered in a very thin wood veneer that is chipping, peeling, or bubbling, aggressive sanding will easily burn through the veneer entirely, ruining the piece. Finally, if you are dealing with a highly valuable, historical antique, it is always best to consult a professional before attempting any chemical or abrasive repairs yourself, as improper methods can destroy the item's value.
Final Thoughts
Removing stains and scratches from wood is often simple with the right approach. From quick home remedies like vinegar and walnuts to deeper repairs using wood filler, most wood surfaces can be restored and protected with proper care. By acting quickly and using gentle methods, you can preserve the warmth and beauty of your wood for years to come.


Answers to Your Common Questions
Light surface scratches can easily be buffed out using olive oil, non-gel toothpaste, or by rubbing a raw walnut over the mark. Deep scratches require filling with wood putty, sanding smooth, and re-staining.
When diluted with water or oil and used properly, vinegar is safe for cleaning wood. However, undiluted vinegar left to sit on wood for long periods can eat away at the protective clear coat. Always wipe it dry immediately.
For white water rings (trapped moisture), use a warm, dry iron over a towel, or rub the area with a paste of baking soda and water. For dark water stains, you will need to strip the finish and use hydrogen peroxide or wood bleach to lighten the wood.
Yes, deep scratches can be repaired by cleaning out the gouge, applying a color-matched wood filler, sanding it perfectly level with the surrounding surface, and sealing it with a protective finish.
Raw walnuts, pecans, non-gel toothpaste, baking soda, olive oil, white vinegar, and mayonnaise are all highly effective household items used to buff out, fill, or hydrate minor wood scratches.
Start by giving the furniture a thorough clean with a mild wood soap. Sand the surface lightly to remove old, flaking clear coats, apply a fresh coat of wood stain if the color is faded, and finish by applying a nourishing furniture wax or polish.
Yes, commercial wood repair kits are highly effective, especially for quick fixes. The colored wax crayons fill gouges perfectly, and the touch-up markers are excellent for masking the raw wood color of fresh scratches.
YOU MIGHT ALSO BE INTERESTED IN