DIY Garment Shortening: Step-by-Step Tutorial
In a fast-paced world of fashion trends and evolving sizes, there's no need to part with perfect garments. DIY clothing alterations empower you to adapt your wardrobe to changing preferences and body shapes affordably. While professional services exist, let's explore straightforward and effective techniques to breathe new life into your clothes.
Effective Techniques For Garment Shortening
Shortening garments is a common alteration to achieve a better fit or a desired style. Whether adjusting pants, sleeves, or dresses, mastering effective techniques is crucial. Explore practical methods for precise and professional garment shortening, ensuring tailored results with ease.
Hemming Trousers and Skirts: A Tailored Touch
Commonly, store-bought garments come in standard lengths that might not align perfectly with your height. Hemming trousers and skirts is a game-changer. Try on the item, mark the desired length with pins, cut off the excess fabric with sharp scissors, fold the hem inside, iron it flat, and sew a straight stitch with a sewing machine or needle and thread. Voila! A polished, custom look achieved effortlessly.
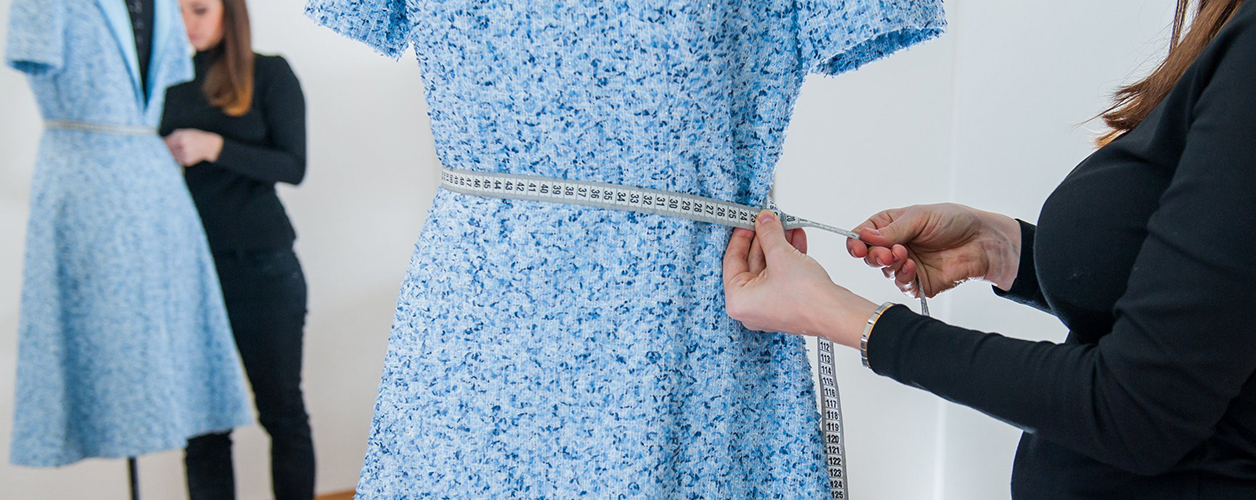
Taking in or Letting out Waistbands: Embrace the Perfect Fit
Our bodies change, and so does the fit of our clothes. Instead of bidding farewell to snug favourites, adjust the waistband. If it feels too tight, let it out by unpicking and restitching the side seams. Conversely, if it's too loose, narrow it down by sewing along the seams. A well-fitted waistband not only enhances comfort but also adds a touch of style to your ensemble.
Resizing Shirts and Dresses: Tailor to Flatter
Resizing shirts and dresses is a valuable skill in the DIY alteration arsenal. To enhance the fit of oversized garments, taper the side seams and sleeves for a more flattering silhouette. Let out the seams slightly for extra comfort if the fit is too tight. A well-fitted outfit boosts confidence and elevates your overall appearance effortlessly.
Shortening Sleeve Lengths: Showcase Your Style
Long sleeves can sometimes make a stylish outfit look messy. Shortening sleeve lengths is a breeze. Note down your preferred length, and trim, and neatly hem the sleeves for a polished and balanced look. This modification works wonders for blouses, shirts, and jackets, providing an easy way to showcase your wrists and accessories with grace.
Adding Darts for Shape: Tailored Elegance
Darts serve as a concealed ally in imparting shape and structure to your attire, especially when it comes to dresses and blouses. Transform a baggy look into a tailored and flattering silhouette by sewing darts strategically. Mark the areas where you want to create the dart, sew along these markings, and witness a remarkable improvement in the fit of your garment.
Precaution To Be Taken During Garment Shortening
Shortening garments, whether it's pants, skirts, or sleeves, requires precision and care to ensure a professional and polished result. Here are some precautions and tips to consider when shortening garments:
- Measure Twice, Cut Once: Double-check your measurements before cutting. It's crucial to be accurate to avoid costly mistakes.
- Try On the Garment: Have the person wearing the garment try it on before you start cutting. This ensures that you get the desired length and fit.
- Marking the Length: Use the tailor's chalk or pins to mark the new length. Make sure the markings are even on both sides for symmetry.
- Consider Seam Allowance: Account for seam allowance when marking the length. If you're cutting and resewing seams, ensure you leave enough fabric for the new seam.
- Cut Gradually: It's better to cut a little less than needed initially. You can always trim more if necessary, but once you cut too much, it's challenging to fix.
- Check for Pattern Matching: If the garment has a pattern (stripes, plaids, etc.), be mindful of pattern matching when shortening. Ensure the patterns align after the alteration.
- Hemming Techniques: Choose an appropriate hemming technique for the fabric and style of the garment. Common methods include machine hemming, hand stitching, or using hemming tapes.
- Pressing and Ironing: Press the new hem before sewing. This helps set the fold and gives a professional finish. Follow fabric care instructions to avoid damage.
- Sewing Machine Settings: Adjust your sewing machine settings according to the fabric type. Use the appropriate needle, thread, and stitch length for the material.
- Finishing Edges: If you've cut off excess fabric, consider finishing the raw edges to prevent fraying. Techniques include serging, zigzag stitching, or using fray-check.
- Matching Thread: Choose a thread colour that matches the original garment. If an exact match isn't available, select a colour that blends in discreetly.
- Test on Scrap Fabric: If you're using a new sewing machine or trying a new technique, practice on scrap fabric first to avoid mistakes on the actual garment.
- Check the Washing Instructions: Before finishing the alteration, double-check the washing and care instructions for the fabric. Some fabrics may require special handling.
- Take Your Time: Rushing through the process can lead to errors. Take your time, especially if you're new to garment alterations. If you're uncertain about any step in the process, it's a good idea to consult sewing guides or seek advice from experienced seamstresses or tailors.
Conclusion
Begin with basic alterations, practice on old clothes, and invest in quality sewing tools and materials. From shortening trousers to taking in a dress or adding darts for shape, the satisfaction of seeing your DIY alterations come to life is immensely rewarding. Unleash your creativity and embark on a journey to transform your wardrobe with these easy DIY clothing alterations! If DIY is not comfortable for you, hiring a local expert tailor is a good option.


