A Step-By-Step Starter Motor Repair Guide For DIY Enthusiasts
When an individual plans to deal with Starter Motor repair on his or her own then one needs to keep in mind electrical accidents and other dangers. So, if you want to repair the starter motor of your vehicle on your own then you have no better choice than our step-by-step starter motor repair guide. This is because from gathering the necessary tools to repair the starter motor and reassembling its components to double-check, we guide you through everything. Therefore, rest assured to find the best step-by-step starter motor repair guide for DIY enthusiasts when you count on our assistance.
Embark On A DIY Adventure For Starter Motor Repair
Although a challenging task, starter motor repair can be done with ease if you are guided in the right way with the best DIY possible. So, if you lack experience and skills, follow the step-by-step starter motor repair guide we mentioned for DIY enthusiasts. Here is how you can repair a starter motor on your own.
1. Gather Required Materials
- Screwdriver Set: Take both Philip's-head and flathead screwdrivers and tighten and remove various components.
- Wrench Set: Secure the starter motor engine by removing nuts and bolts.
- Socket Set: Used to loosen and tighten bolts like mounting bolts.
- Multimeter: Tool used to check motor voltage, resistance and continuity by testing all the electrical components.
- Replacement Parts: If replacement is necessary, gather brushes, solenoids and other important components prior.
- Safety Glasses: To protect your eyes from potential dust, debris, dirt particles and debris.
- Insulated Gloves: Protects you from potential electrical shocks while you are working on starter motor repair, especially your hands.
- Jack Stands: Upon finding the starter motor underneath the car or truck, gain access to it by lifting it with jack stands.
2. Take Safety Precautions
Ensuring your safety before repairing your vehicle's starter motor is to properly take necessary safety precautions as this helps you prevent injuries. You can take safety precautions like understanding the task fully and wearing appropriate personal protective equipment (PPE) in addition to the following:
- Identify your vehicle’s battery by referring to the manufacturer’s manual.
- Make sure the vehicle’s engine is turned off preventing accidental starts and injuries.
- To prevent electrical shocks, ensure to disconnect your vehicle’s battery by disconnecting all the negative terminals.
- While repairing the starter motor, be aware of fluids in the surroundings.
- If working indoors, ensure the working area is well-lit and ventilated.
3. Locating The Starter Motor
As one of the issues starts from the vehicle's starter motor, it is crucial to consider starting your repair process by locating the part correctly. You determine the right location of the starter motor to refer to the vehicle repair manual that comes along with the vehicle. So, open the vehicle's hood to locate the main engine and understand the layout. Look for an underside region of the vehicle engine to locate the right location of the starter motor and follow its connections to the battery. In addition to locating the starter motor, identify the component like solenoid as it engages the starter gear functionality.
4. Remove The Starter Motor
After locating the starter motor, it is time to remove the starter motor by disconnecting the battery's negative terminal and ensuring the safety of the repair process. This action is done to prevent electrical accidents and use tools like bronze to disconnect the terminals from electrical cables. At the same time, remove brackets, covers and other parts while carefully inspecting the vehicles’ starter motor as they might obstruct the removal of the starter motor. Now, focus on disconnecting the wires like the main power cable and control wires attached to the starter motor.
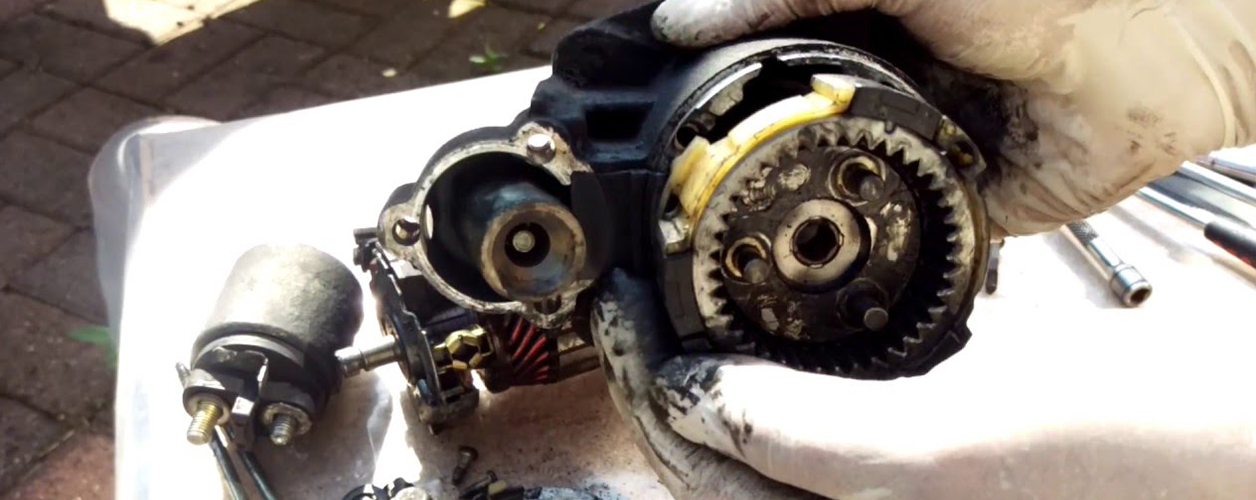
5. Starter Motor Inspection
Later, the conductor inspected for physical damage to the starter motor to find visible cracks and loose connections. Both of these can cause physical damage compromising on the structural integrity and electric issues respectively in addition to causing wear and tear. Also, you need to examine for wear on the pinion gear, a small end part of the starter motor shaft that usually has a teeth-like appearance. Moreover, check for damage to flying ring gear and inspect the functioning of the solenoid. There is also a must thing to look for signs of overheating like starter motor discolouration, or damage to the internal part of the starter motor. If you're unfamiliar with the components mentioned, seeking assistance from a seasoned starter motor repair expert for inspection is advisable.
6. Test The Motor With a Multimeter
The next step in the step-by-step starter motor repair guide is to test the starter motor with a multimeter that is set at ohms resistance. The purpose of testing the motor with a multimeter is to identify electrical issues within the starter motor. So, locate the starter motor terminals like negative and positive that are usually marked as + or B and - or M respectively. Also, test the continuity of motor windings by placing the multimeter on starter motor terminals and checking the displayed resistance value. An indication of damage in your starter motor is lower or higher resistance ranges. Then, interpret the results as follows:
- Specified Resistance- Proper functioning of windings.
- High Resistance- Breaks or open circuits in windings.
- Low Resistance- Short circuit in windings.
7. Test Starter Motors’ Solenoid
After testing the starter motor with a multimeter, do the same to solenoid terminals to check the continuity of resistance for effective working of the vehicle. Place each probe of the multimeter on the vehicle terminal called control circuit “A” and power circuit terminal “B”. The results shown out of this test indicate the passage of effective electrical signals to activate the vehicle when the ignition is turned on. Then interpret the results of testing the starter motor solenoid in the following manner:
- Continuity- The solenoid is functioning properly.
- No Continuity- Problems with solenoid, mainly faulty connections and broken coil.
8. Check Communicator And Brushes
Upon removing the Starter motors and cap you find a communicator and brushes. A communicator is typically found in a cylindrical shape that usually comes in contact with brushes around it throughout its operations. So, inspect the communicator for signs of damage, unevenness, scoring or wear to smooth the starter motor functioning. Upon finding the signs, clean the communicator with a clean white cloth or a suitable cleaner that removes debris and grease. Brushes are those components of the starter motor that usually have an appearance of small and spring-like outlook.
9. Replace Faulty Parts, If Any
If you find any faulty parts in the starter motor, then determine which of the parts is damaged that should be replaced at any cost. The faulty parts might include brushes, communicators and any other essential components. Then, choose the correct replacement part of the vehicle and check the information for compatibility issues. At last, gather the necessary parts to be replaced from a reputable dealer and follow the manufacturer's instructions to install the new components. Before you proceed with the next step, make sure all the replaced parts are properly and securely aligned.
10. Reassemble The Starter Motor
Once the repair is done start reassembling the starter motor by carefully placing all the components back into their respective places and ensuring everything is seated properly. Now, position the starter motor concerning the engine block and align the bolts and nuts of the motor in the same way. To secure the starter motors tighten nuts and bolts for a secure fit by referring to the manufacturer's instructions and manual. Then, reconnect all the wires that have been previously removed from the starter motor and ensure all the terminals are connected correctly. Reinstall the other components and do a final check.
11. Test The Starter Motor
Once the final check is done after reassembling the Starter Motor and its components proceed with testing the motor. To test the starter motor, you must turn on the ignition key to the “start” position and see if the motor is engaging properly. After turning on the ignition listen to identify any kind of unusual noises coming from the starter motor to determine the issues, if any. Later, double-check all the terminals and connections to make sure everything is secured and tight before using the vehicle.
Conclusion
So, the only thing you need to make sure is to keep the manufacturer’s manual aside before starting the repair procedure. Thus, we took a look at the information we provided and implemented the same for a tailor starter motor repair process. But if you are hoping for immediate action for the starter motor repair, then it’s best to hire a mechanic or seek professional help from a qualified auto electrician instead.


